
UPDATE: Woo Hoo!!! My bag got featured on Sew Mama Sew Flickr Feature for Bag Month!! I don’t think I could be prouder of my bag than now! 🙂 Go check out all the other wonderful bags for Bag Month here
So the Amy Butler Hawaii crafting fest begins with our first sewn object, the Weekender Bag. This pattern was my motivation for learning to sew. I loved this bag since I first saw it and was giddy the entire time I was putting it together. I felt like a proud mama when I finally got it done.
Fabric: Joann’s upholstery Fabric
Inspiration: Amy Butler Weekender Bag
Modifications: Added a sub par elastic pocket to the inside, used a separating zipper
Difficulty: 9
Enjoyment Factor:9
Sewing Time: Off and On for two weeks
The Good:
- The pattern is very well written and I was never lost during the process which resulted in a very professional looking finished bag. I love all the attention to detail despite the price I paid in blood…literally.

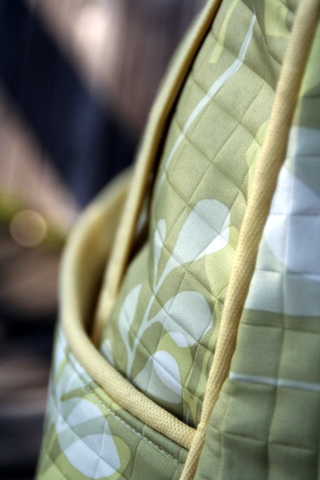
- The fabric! I loved this fabric and bought it quite a while ago when JoAnn’s had it on sale for the first time at 50% off. When I saw it again for 75% off, I bought two more yards. It is very durable despite its delicate look. I love the quilting on it. It just looks so fresh and so clean clean.
- The size of this bag is wonderful. When I saw the picture I thought that it might be a little small to handle a weekend worth of my stuff, but man can you really load this thing up. Not only did it hold a weekends worth of stuff
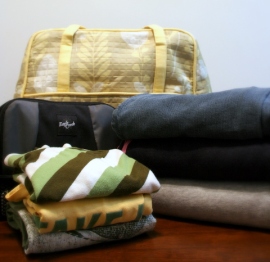
3 pairs of pants, three shirts, a pair of shoes and my toiletry bag with some room to spare

It also held my sewing machine with even more space for notions and accessories INSIDE, let along the outside pockets!!
The Bad:
- The cording! Although I love the way it looks, it was the most labor intensive detail I have sewn yet. I probably ripped enough seams to have made this bag three times over. It was like the Goldilocks rhythm set to the act of sewing. I sew…oops didn’t sew close enough…rip. Sew…oops sewed too close and over the cording….rip. Ahh, sew between where I was the first time and second time….just right!
- What is up with the closed bottom 30″ zipper!! This thing does not seem to exist as a common place item. I had to use a separating zipper in a cream color, then I sewed over the open end and made my opening a little smaller to make sure that it would never get to the point of separation. It works fine, but why make us jump the hurdle of finding this elusive 30″ zipper. This is where I wish the pattern gave alternatives. Next time I may use the dual zipper so that you can open it from either side because on one hand it is cool, on the other it comes in 30″!
- The layers on this bag are thick and murder on sewing pins. I had to throw away at least half the pins I had because they were so misshapen at the end of the project.
- The pins! Because of the layers they were like razor sharp daggers jutting out of the bag. Ouch, ouch, Sh*t, ouch, damn it, ouch was pretty much my mantra throughout the process. I got the scars to prove it!
- Although I LOVE the colors, I do realize that yellow is not the most practical and durable of colors when it comes to a travel bag. I will try to Scotch Guard it or something to help out the longevity a little
- The time involved in sewing this bag is just what one would have expected in such a wonderful bag but it is still hard to take in. I sewed this bag over a two week period. Each step taking longer due to the layers, daggers of death (pins), and the rip rip ripping of progress.
The Ugly:
- Although I didn’t show it I added a elastic pouch inside for holding my undergarments separate from the clothes. This was the first time I did this using the tutorial from here and it just didn’t come out right. It was just too loose in the end. It is starting to bother me a little since the rest of the bag came out so wonderfully. I will probably add some Velcro to achieve the effect I want.

I seriously covet that bag! I admire people who can sew so much. You did such a great job!
I love your bag. I am a knitter that started sewing in May of this year. I have been drooling over this pattern. I definitely want to sew this bag. You and I have the same type of sewing machine. :o) Congrats on a job well done.
Seriously, such a sweet bag. I don’t sew, but seeing this type bag makes me wants to learn. Great job!
Absolutely Fabulous! Beautifully done. ^_^
i made this bag myself. had the same problems you had, but i actually hated the pattern and having to make the pieces of that myself. in the end, it is a nice bag, but the layers. oh god, the layers. i’d love another, but i don’t think i have the stamina. haha. kudos to making it through.
the bag is amazing! well done you! *//(‘;’)\\*
well now i have got to make it and your detailed explanation is just fantastic. I invent new words when i am trying to fit zips (they are not my strong point) I am worried that my sewing machine may not be up to sewing through the layers though. Did you find this a problem? I have lots of orders for people to complete but then i think i will definitely make it for myself. Well done for attempting the inside compartment.
This bag is gorgeous! You really did a great job on it. It looks store bought. You should be very proud of your sewing skills.
It is beautiful!! I’m seriously gonna have to scout out that pattern. Thanks for the informative play-by-play. I’m glad I’m not the only one who pokes myself with pins so hard I end up bleeding all over my project…. 🙂
Since retiring I have took up the art of sewing again, though nothing nearly as elaborate as what you have accomplished. You are to be admired for your painstakingly immaculate work.
Now that is a bag! Fabulous and well made. Kudos!
Seriously, you did a fabulous job! Love the fabric, and the contrast you used for the cording. Oh, the cording! You know as good as the pattern is, you always think that there will be clever ways to avoid that kind of pain. There’s not.
Your bag is absolutely beautiful, and your observations about everything were right on! Congratulations.
That is a beautiful bag! I’m bookmarking this post for inspiration and information when the time comes for me to sew up that bag (it’s on the list, but I need to learn to sew first!).
Another beautiful project. Where do you find such beautiful fabrics?
Great bag! This pattern has been sitting on the desk in my sewing room taunting me for months. I’m afraid….It’s great to read posts from those who have made this bag. I’ll bookmark it for reference if I can get my self to actually make it. I know about the pin prick mantra…you know it’s ugly when your husband pops his head in to make sure you’re ok. 🙂 Great post!
Fantastic bag! I loved reading your trials and error with making it too. My fabric is still sitting gathering dust whilst I build up the courage to cut into it. Thanks for the tips about the cording too, a part I am sure I will do the same with too. I love the quilted look of the fabric too, adds to the detail.
Way to go and I love how you share the details of your experiences so we are not left just being envious of your gorgeous bag. 🙂 I am sure the bag will be gorgeous in the Hawaiian sun and I can’t wait to see the other items, especially the hat.
I love your bag! And thank you for your detailed experience!! I will so bookmark this when I make it. Again, so beautiful!
It’s beautiful. The cording really adds a professional touch. Thanks for the detailed review.
That is awesome. I rally want to make this bag, but I’m afraid to–I’d give up after the second time I ripped out the cording! Way to persevere.
I love it!! So gorgeous–how come my Joann’s never has fabric that nice?! I’ve been eyeing this pattern for a while, but I just assumed it was too complicated for me; now I’m reconsidering it…
This bag is gorgeous. Because of you I am thinking about taking a sewing class, your crafts: quilting, knitting and now sewing are just gorgeous!!!
SWEET!!! It makes me sad that I have a great sewing machine that sits under my desk collecting dust. Great job!
You did an amazing job on this Mo! Glad I got to see it in person!
Great job. I love this pattern too, your fabrics were the perfect choice. The quilted texture gives the bag a very luxurious look.
I have been wanting to make this one FOREVER!! I love this bag. Seeing yours makes me want to make one . . . humm, too bad that I leave for town in 2 weeks. Just not enough time! Next time . . .
Yours ROCKS!!!
Pingback: Here Comes the Sun « The Lint Knitter
It turned out awesome! The prequilted fabric is so pretty and makes the bag look so professional. I had no idea how huge the bag ends up – it towers over your sewing machine!
Pingback: Sew,Mama,Sew! Blog » Blog Archive » Flickr Feature ~ Bag Month
I saw your bag over at SMS. Beautiful! You obviously have the zipper thing down. One day maybe I’ll get to add one to my Groovy Bag! :o)
I have this pattern and have wondered how long it might take. Clearly it’s for when my young ones are older and I have more time to dedicate to it.
That bag is gorgeous!!!!
Beautiful bag, and looks like it was worth every minute, considering how much you will use it. All of the details look so professional.
Oh my goodness, that bag is too gorgeous!! I love everything about it, it’s *perfect*.
Another admirer, this bag is awesome! My favorite of all the bags featured on S.M.S. : )
Pingback: The Lint Knitter
Pingback: Amy Strikes Again… « The Lint Knitter
ahhhhhhhhggggggggghhhhhh. I want that fabric. my local Joann had it once, ONCE, a long time ago, and when I went back in just two weeks after i saw it, it was gone. Gone, I say, and they never got it back. SO, so very jealous of your fabulous bag, and that incredible perfect fabric that no one at Joann’s seems to realize is the best print e v e r. *sigh.
Hi! I just came across this and had to chuckle: I got the same fabric intending to use it to slipcover a desk chair, but I had some trouble with my pattern and the project was delayed, but I happened to be at JoAnns another time and the fabric was reduced even more so I had to get a whole bunch more. Then recently I’ve been searching for a new shoulder bag- mine are all getting kind of ratty- but all the bags in the stores are really ugly lately, so I finally made up my mind to just make my own. I came across the scraps from my first slipcovering attempt and realized they would make an amazing bag! But I didn’t have time to finish it….someday, though I too will have a beautiful bag! Maybe not quite as nice as yours… anyway…
rendering of my chair: http://a.parsons.edu/~fishg330/misc/chairrender.jpg